


32. Panhard Chassis Bracket
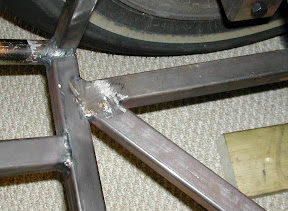
The panhard bracket is positioned on top of the joint between the panhad support cross member and the rear end bottom tube. This region differs from the book on my custom build because I placed all of the tubes below the axle flat on the deck (instead of placing one long bottom tube at an upward angle toward the rear). I did this to provide more clearance for the rear axle in full droop. The technical also elimintated any compound angles needed to install the cross member, and it made it easy to locate a flat area to mount the panhard bracket to the chassis. The angle grinder made quick work of removing filler material on the joint which would otherwise interfer with placing the bracket squarely over the joint.
The bracket and rod-end assembly is a combination of parts from a typical stock-car catalog company. The bracket is usually sold as a "shock mount" with 3/4" holes on each side. I chose 1/2" rod ends because they are plenty strong enough, easy to come by, and I wanted to be consist throughout the build.
 The holes in the bracket are usually filled with smooth bore steel bushings positioned just the right distance apart to hold the rod end without any gaps. The bushings have a 3/4" OD and a 1/2" ID for a perfect fit. One of the bushings usually comes welded to the bracket while the other one is ready to be inserted at the correct depth. I suppose you could leave the second bushing unattached and just run a 1/2" bolt through the whole assembly (relying on the welded bushing to hold everything in place), but I chose to weld the second bushing in place once everything was assembled and tack welded in the right spot. This approach ensures that the rod end won't slop around inside the bracket.