|
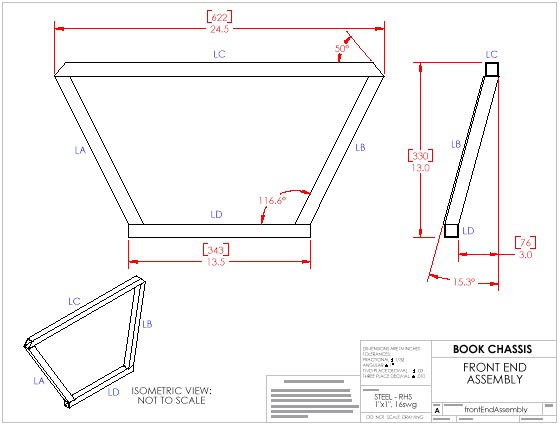
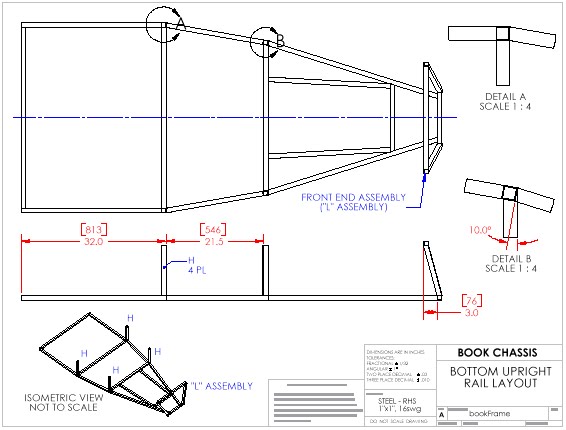
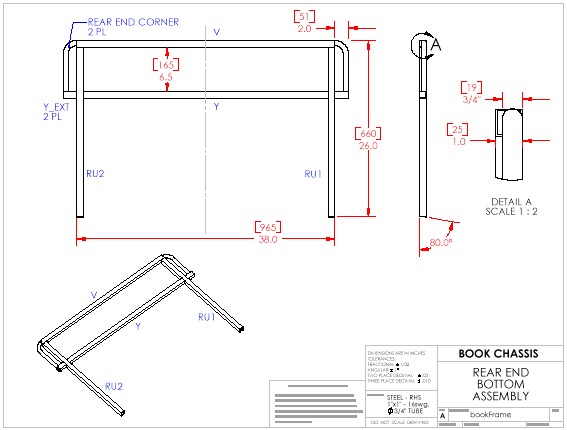
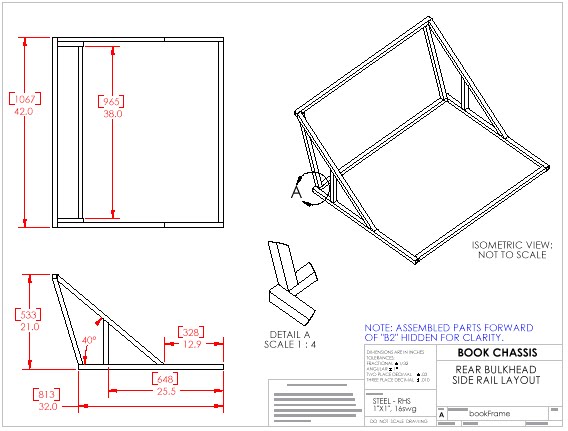
The chassis plans on this site are based on the original Locost design presented in Ron Champion's book. The plans are not complete, but they should provide you with a very good (and very accurate) starting point. You still need a transmission tunnel and certain triangulating members that are not shown. Be sure to refer to the book for these structurally critical pieces. I've excluded them from the drawings because each builder tends to customize the transmission tunnel to meet their needs (cut-to-fit). The missing triangulating members were simply too difficult to model with the computer.
Paying respect to Mr. Champion's original work and keeping with the spirit of being Locost, you are free to use the drawings below at your own risk. Please do not host, redistribute, or attempt to profit from the files that you retrieve from this site. I only ask that you refer to this website (http://www.sevenesque.com) as a favor in kind.
Notes regarding Unit of Measure:
The CAD models were developed using standard measures based on 1" and 3/4" rectangular tubing. The drawings show secondary dimensions based on an automatic conversion from standard to metric. As such, each measurement that depends on the width of the tubing as a point of reference will be off by at least .4mm (25mm vs. 25.4mm). This small difference is compounded during the assembly process when working with computer software. In the real world however, the overall effect of this discrepancy is negligible given the accuracy of most shop tools (or lack thereof).
|
Download Hints
1) You may need to install Adobe Acrobat Reader to view the drawing files.
|

|
|
2) PC users: You can save the files to your computer with a right-mouse click on the link and then choose "Save Target As..."
|
Download the Drawings
There are three drawing packages to choose from. All of them are based on the original Locost design, including the front end design to accomodate a standard nosecone and the suspension design found in "The Book." I do not have any plans for the Locost suspension since the book provides a lot of detail and your donor parts may differ greatly.
NOTE: Details of the transmission tunnel, suspension brackets, and triangulating strength members are not provided in any of these drawing packages. It is assumed that donor parts and personal choice will dictate the final geometry of the transmission tunnel and suspension. You must refer to the overall book design, use common sense, and embrace a "cut-to-fit" approach once you have a basic chassis.
-
-
McSorley 400 - Plans 
An increase of 4" through the entire width of the chassis with subsequent changes to the diagonal members as needed. There are a few vendors manufacturing a +4" nosecone by adding 4 inches clear down the center. This can also be accomplished at home with little effort. Standard front wishbones should bolt right up assuming the track width of the donor axle is exactly 4" greater than the UK based Ford Escort Mk1 (the book donor).
-
McSorley 442 - Plans
An increased width, length and height using the nosecone and suspension mounting points suggested by the book. The increased width exists through the rear and the cockpit, while the front end is based on the book chassis and it uses a standard nosecone. The suspension brackets can be mounted according to the layout provided by the book, but the length of the front wishbones should be customized to be sure the track width agrees with the donor axle following assembly.
The increased length provides an additional two inches for the pedal box and another two inches in the engine bay. The increased height goes through the horizontal portion of the chassis (forward of the dashboard) to balance the over all design and accommodate taller engines. A standard nosecone that is 26 inches wide at a distance of 12 inches from the front should fit with little-to-no modification, although a tall "cowcatcher" is called for to bridge the bottom of the taller chassis with the bottom of the relatively stout nosecone.
There are some vendors manufacturing nosecones that are taller than the book design to provide even more height for the engine. For example, Champion Motor Cars used to produce an oversized nosecone that sits 13" below the top rails and an additional 1" above the top rails... placing a full 23.5" under the bonnet while leaving a relatively small 2" gap along the bottom of the 442 chassis. This oversized nosecone is still available from certain vendors. A standard book nosecone leaves a 5" gap along the bottom of this super-sized chassis, but the width is spot-on.
-
McSorley 442E - Plans
An increased width/length/height of 4/4/2 inches (respectively) over the original book design throughout the entire chassis, requiring a wider nosecone. Oversized nosecones are available from certain vendors, but I have not tested any of these options to see how they fit. The suspension brackets can be mounted according to the layout provided by the book, but the length of the front wishbones should be customized to be sure the track width agrees with the donor axle following assembly.
The increased length provides an additional four inches in the engine bay with a relatively "book" sized cockpit. The increased height goes through the horizontal portion of the chassis (forward of the dashboard) to balance the over all design and accommodate taller engines.
|