


12. Rearend Bottom Layout
 The rear bottom tubes were possibly the easiest parts to add to the custom chassis design. They sit square and flush with the existing bottom rails using simple clamps and a carpenter's square. I decided to position these rear bottom tubes flat with the deck instead of using the book design, which kicks this tube upward toward the rear at about 10 degress. Keeping the rear bottom tube flat on the deck will provide more clearance when the axle is in full droop, it will make it a little easier to install the axle when the time comes, and it simplifies the build process.
The outside face of the rear bottom tube is flush with the inside face of the previously installed bulkhead upright. This puts a full 2 inches between the outside face of the chassis and the outside face of the rear bottom tube in order to clear the rear axle mounting brackets later in the build. The open ends of the rear bottom tube are cut at 20 degrees to hold the rear bottom cross rail at an angle off the deck.
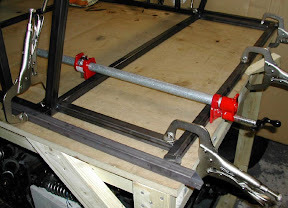 The rear bottom cross rail is centered on the chassis and sits flush on the end of the rear bottom tube at an angle of 20 degrees. An extra piece of tubing stock was clamped along side the bottom railes to provide the correct alignment for the cross rail. The ends of the cross rail are cut with a semi-circle notch (fishmouth) to accomodate 1" round tubing. The round tubing will wrap around the bottom of the rear end later in the build.
