05. Top Rail Layout
|
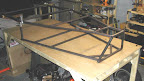
Tack welding some of the new joints along the bottom face of the lower rails required that I invert the chassis. This exercise begot an idea to layout the top rails by clamping them to the table underneath the inverted chassis. The most notable benefit is the ability to hard mount the upper rails to the table as opposed to trying to float them on top of the vertical uprights; "floating" the inverted chassis is much easier because it tends to stay in one spot under it's own weight. |
|

 |
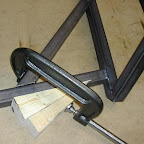
Another trick that simplified this approach was the use of 90 degree corner clamps that I picked up at the local home improvement store while shopping for ideas. I used the clamps to mount the uprights (already cut for later in the build) to the inverted lower rails to support the weight of the back half. Acting as a spacer, the uprights also kept the chassis assembly at the correct height over the top rails. The corner clamps have proven to be an indispensable part of the assembly process as they save a great deal of time and headache... well worth their cost and highly recommended. |

|
|
Positioning the front triangulation was also easy work using the adjustable corner clamp for the first tack weld. A slightly less elegant approach was used when a little more force was needed to get things in line. |
|

|
The completed upper rail, front end, lower rail layout is shown here in the inverted position. The only thing keeping the upper and lower rails properly distanced are the temporarily clamped uprights. The next step is to attach the uprights in the correct position and finalize the front half of the basic structure. |
|